[VB.NET] REST API⑩ ビューからWeb APIにPOST#2(View追加と実行)
前回はビュー用のコントローラーを追加しました。
今回はいよいよビューを追加して、「ビューからリクエスト」 > 「APIで処理」 > 「ビューで処理結果を表示」までを実行します。
ビュー(View)の追加
ビューを配置する フォルダー を用意します。
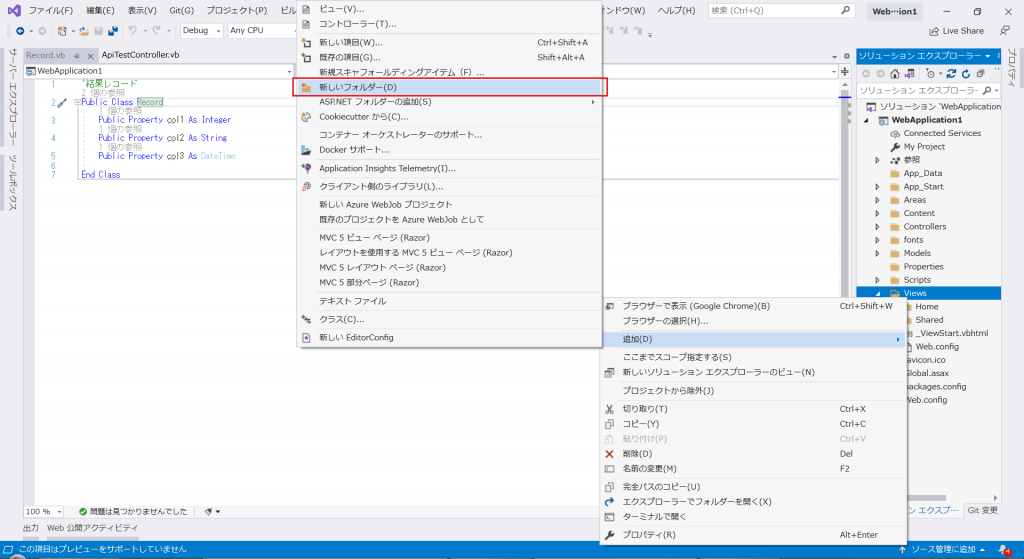
ソリューションエクスプローラで、「Views」フォルダーを右クリックして表示されるメニューから、
「追加」>「新しいフォルダー」を選択します。
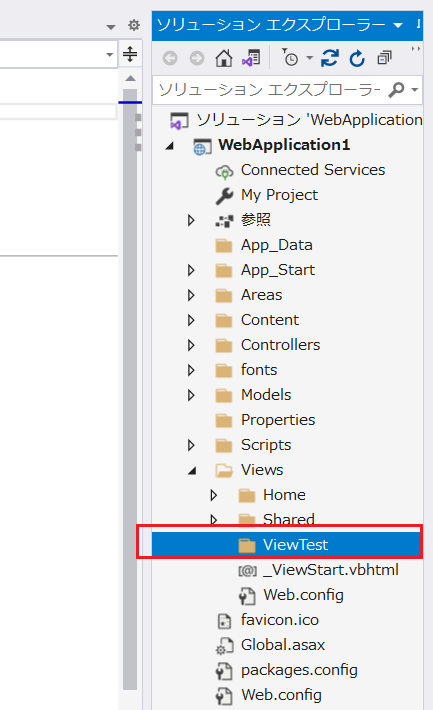
作成したフォルダーの名前は「ViewTest」にします。
ビューを追加します。
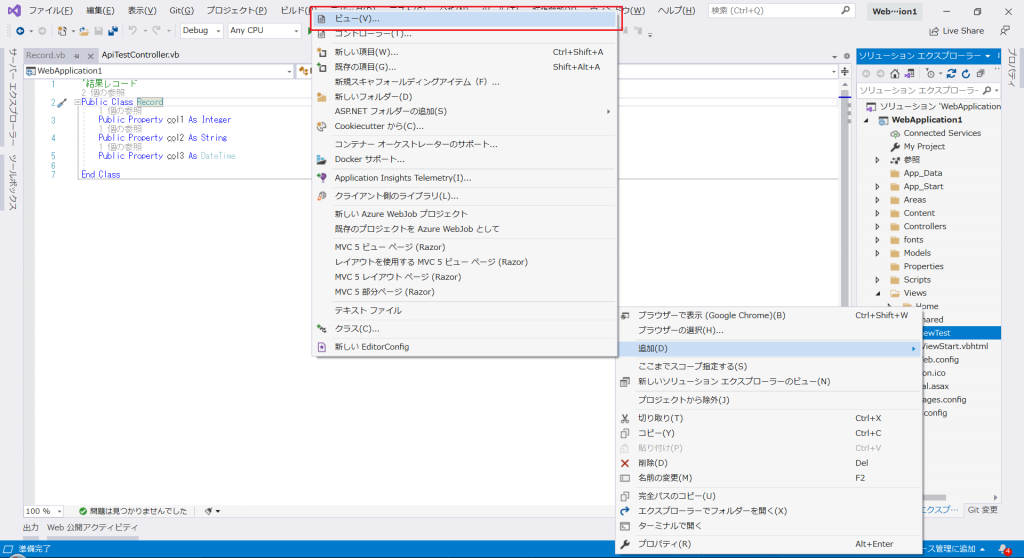
ソリューションエクスプローラで、作成したばかりの「ViewTest」フォルダーを右クリックして
表示されるメニューから、「追加」>「ビュー」を選択します。
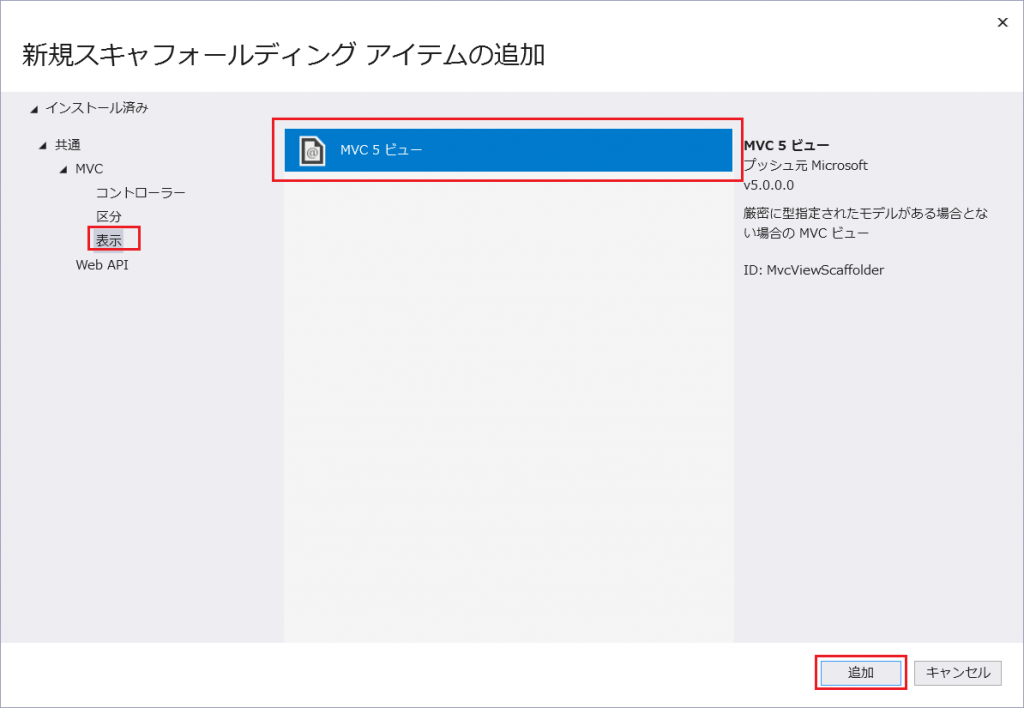
「MVC」>「表示」>「MVC5ビュー」を選択し、「追加」をクリックします。
ビュー名は「create」とし、テンプレートも「create」を選択します。
モデルクラスは「Record」を選択して、「追加」をクリックしてください。

「ViewTest」フォルダーに「create」という名前のビューが追加されます。
これで、「ViewTest/create」というビューと、それを処理する「ViewTestController」というコントローラーが用意できました。
ただ、このまま実行してもエラーになります。
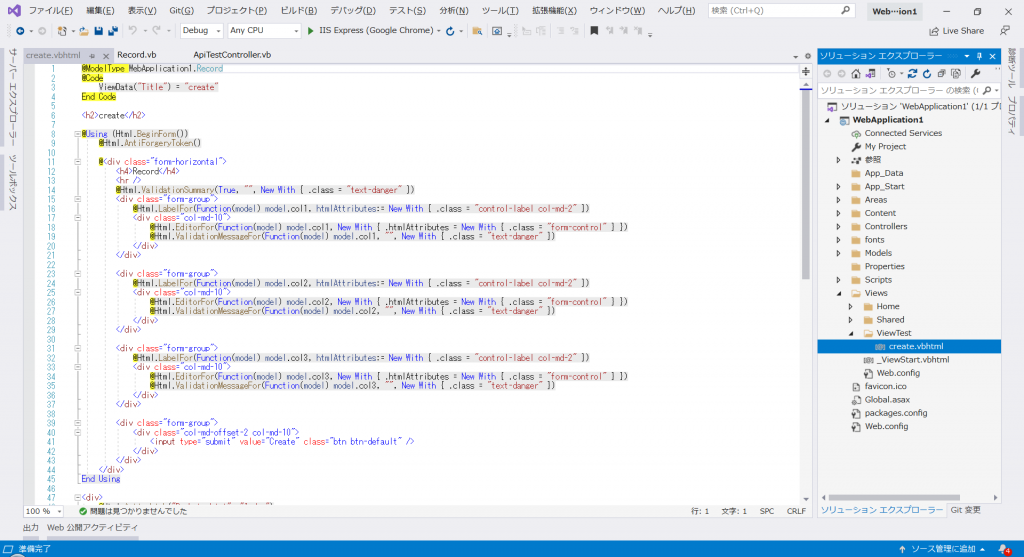
追加したビュー(ViewTestのcreate.vbhtml)を変更して、パラメータを受け取れるようにします。
まずはMediaTypが「Record」になっているのを、「ViewTestParam」クラスに変更します。
メッセージ表示用に「message_label」というラベルを用意し、 「ViewTestParam」クラス の「Item2」の内容を赤文字で出力するようにします。
また、入力エリアは「ViewTestParam」クラス の「Item1」の内容を出力・検証するようにします。
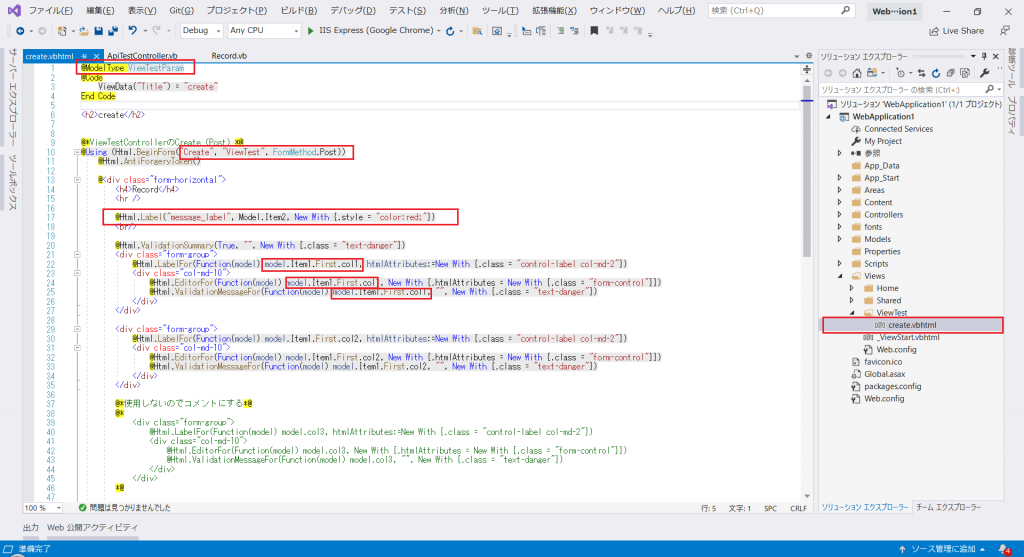
コード
@ModelType ViewTestParam
@Code
    ViewData("Title") = "create"
End Code

<h2>create</h2>


@*ViewTestControllerのCreate (Post) *@
@Using (Html.BeginForm("Create", "ViewTest", FormMethod.Post))
    @Html.AntiForgeryToken()

    @<div class="form-horizontal">
        <h4>Record</h4>
        <hr />

        @Html.Label("message_label", Model.Item2, New With {.style = "color:red;"})
        <br/>

        @Html.ValidationSummary(True, "", New With {.class = "text-danger"})
        <div class="form-group">
            @Html.LabelFor(Function(model) model.Item1.First.col1, htmlAttributes:=New With {.class = "control-label col-md-2"})
            <div class="col-md-10">
                @Html.EditorFor(Function(model) model.Item1.First.col1, New With {.htmlAttributes = New With {.class = "form-control"}})
                @Html.ValidationMessageFor(Function(model) model.Item1.First.col1, "", New With {.class = "text-danger"})
            </div>
        </div>

        <div class="form-group">
            @Html.LabelFor(Function(model) model.Item1.First.col2, htmlAttributes:=New With {.class = "control-label col-md-2"})
            <div class="col-md-10">
                @Html.EditorFor(Function(model) model.Item1.First.col2, New With {.htmlAttributes = New With {.class = "form-control"}})
                @Html.ValidationMessageFor(Function(model) model.Item1.First.col2, "", New With {.class = "text-danger"})
            </div>
        </div>

        @*使用しないのでコメントにする*@
        @*
            <div class="form-group">
                @Html.LabelFor(Function(model) model.col3, htmlAttributes:=New With {.class = "control-label col-md-2"})
                <div class="col-md-10">
                    @Html.EditorFor(Function(model) model.col3, New With {.htmlAttributes = New With {.class = "form-control"}})
                    @Html.ValidationMessageFor(Function(model) model.col3, "", New With {.class = "text-danger"})
                </div>
            </div>
        *@

        <div class="form-group">
            <div class="col-md-offset-2 col-md-10">
                <input type="submit" value="Create" class="btn btn-default" />
            </div>
        </div>
    </div>
End Using

<div>
    @Html.ActionLink("Back to List", "Index")
</div>

@Section Scripts
    @Scripts.Render("~/bundles/jqueryval")
End Section
実行して確認する
さっそく実行してみましょう。
実行方法はこちらを参照してください。
もし、「実行したらAPIのメニュー画面が開いた」という場合は、
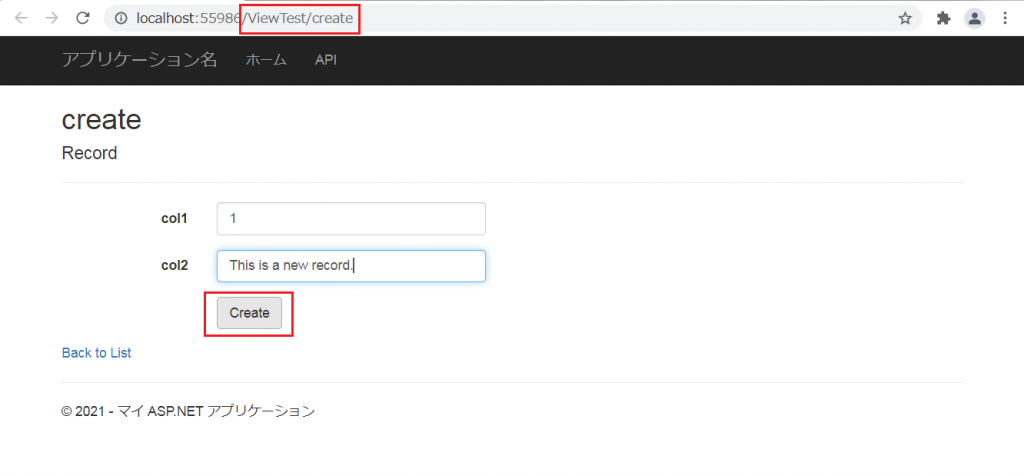
アドレスバーに「/ViewTest/create」と入力してEnterキーを押してページを移動してみてください。
col1、col2を入力し、「Create]ボタンをクリックします。
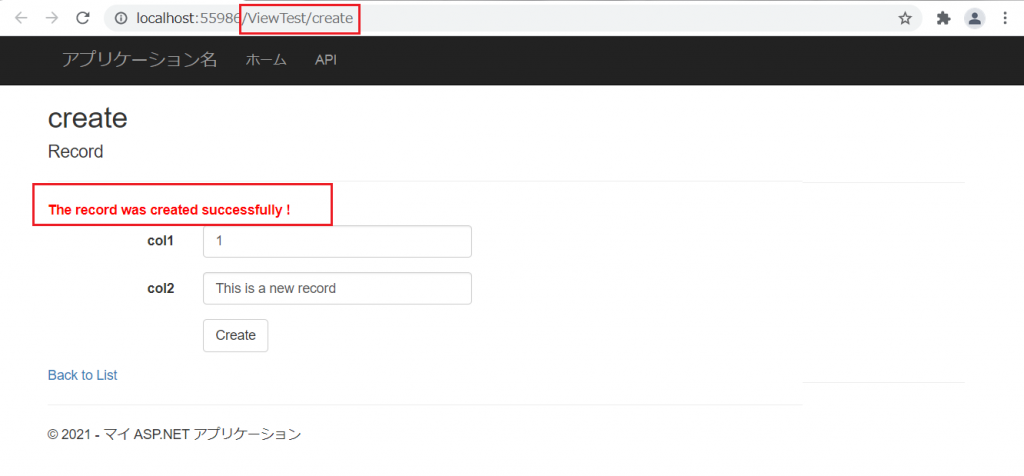
赤文字でメッセージが表示されたら、APIの呼び出し成功です。
出力ウィンドウも見てみましょう。
「ApiTestController」でリクエストの内容を取得できていることが確認できます。
─出力─────────────────────────
col1:1
col2:This is a new record
col3:2021/01/01 0:00:00
────────────────────────────
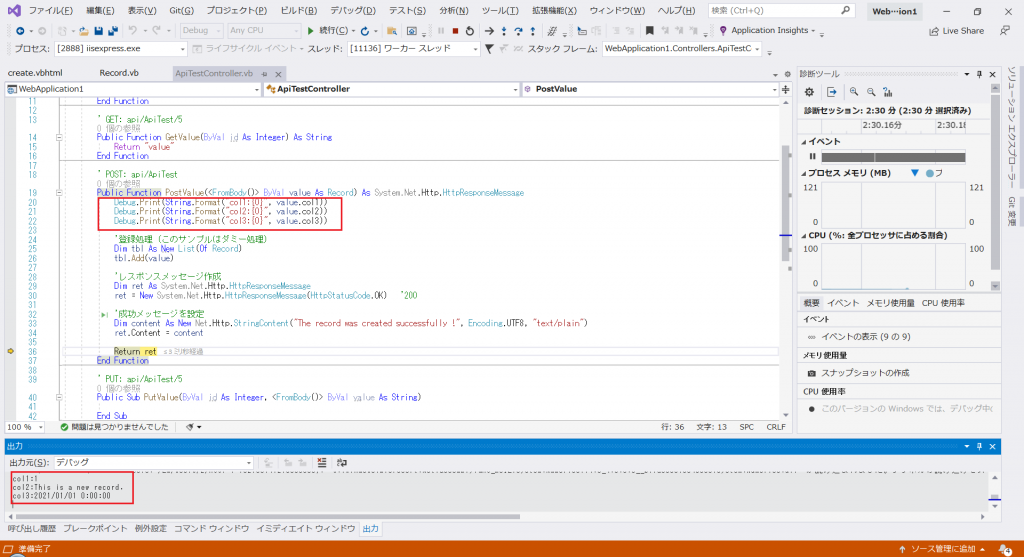
ビューからPOSTリクエストをおこない、APIで処理した結果をビューに表示させてみました。
今回のサンプルではリクエストの内容をコンソールに出力しただけですが、実際にはデータベースやファイルへの登録をおこなう処理を実装することになります。